SyNc KICK Drum Patch Explained:
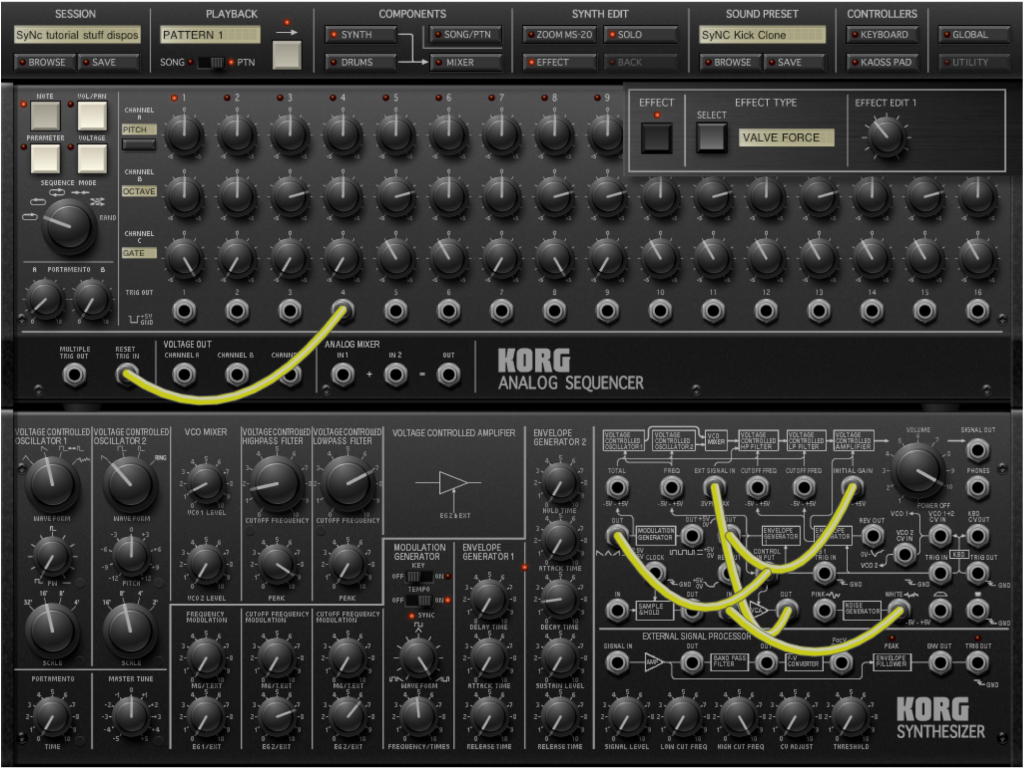
Copy the patch and re-open it as a synth patch. Play some keys and listen to the KICK patch you can break it down into these components. This patch consists of three components: SYNTH, SEQ, and FX parts.
- a transient attack “Thud†– this part sounds the same no matter which key you play. Therefore it can’t be from a VCO which would change with the key event.
- a barely audible pitch; if you play the upper most and lower most keys, you can hear a slight difference in the pitch. So, this part is probably from a VCO.
- a noisy almost snare-like component right at the end of the note event
- a fuzzy thickness
The Transient Attack Thud is actually done using a secret trick of the iMS-20: the filters will self oscillate if you turn up the Q (Peak) control enough, even if there is no input (VCOs turned off). In the original analog synth, the filter was excited by the analog noise in the system – enough so to cause the filter to ring or oscillate. EG2 is used to modulate the cutoff frequency with the Decay knob only. The sustain is set to 0 because this is a transient attack portion. Because you are self-oscillating the filter, it doesn’t depend on the key (note) you hit.
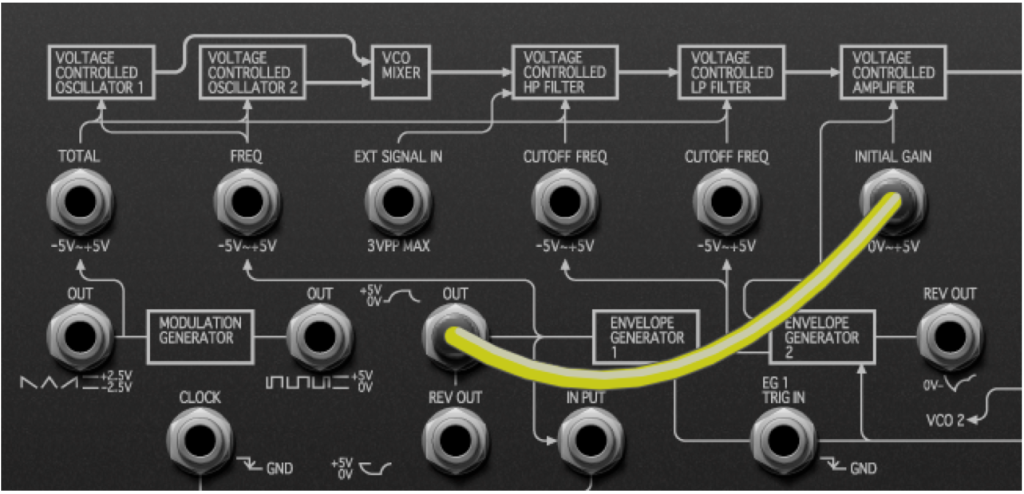
The Pitched part is one of the VCOs on Sawtooth with clever patching of EG1 into the VCA’s INITIAL GAIN input. The reason is that EG2 is already used for the transient portion. Its sustain must be set to 0 for the transient thud. So, EG1 is used to sustain the pitched portion of the sound.
The noisy portion at the end of the note event is done with the Noise Generator. It is actually a noise ramp, controlled by the Modulation Generator set to a Ramp wave. The frequency of the ramp is controlled by the MG’s Frequency knob. However, in the actual template, you never hear the noise ramp repeat; it is cut off before it gets a chance to repeat and you only hear the beginning of the first ramp-up. This is done with the Sequencer by using the Gate controls of Steps 1 and 2 as a note-on/note-off combination. You’ll see how to change this during the tutorial below.
Finally, the KICK sound is made thicker and fuzzier by using the Tube Emulation effect. The FX controls the thickness and fuzziness simultaneously.
So, this patch is full of neat iMS-20 tricks: self oscillating HPF, using EG1 to control the pitched part, using the Sequencer to control the duration of the note event, and using the FX to fatten up the sound.
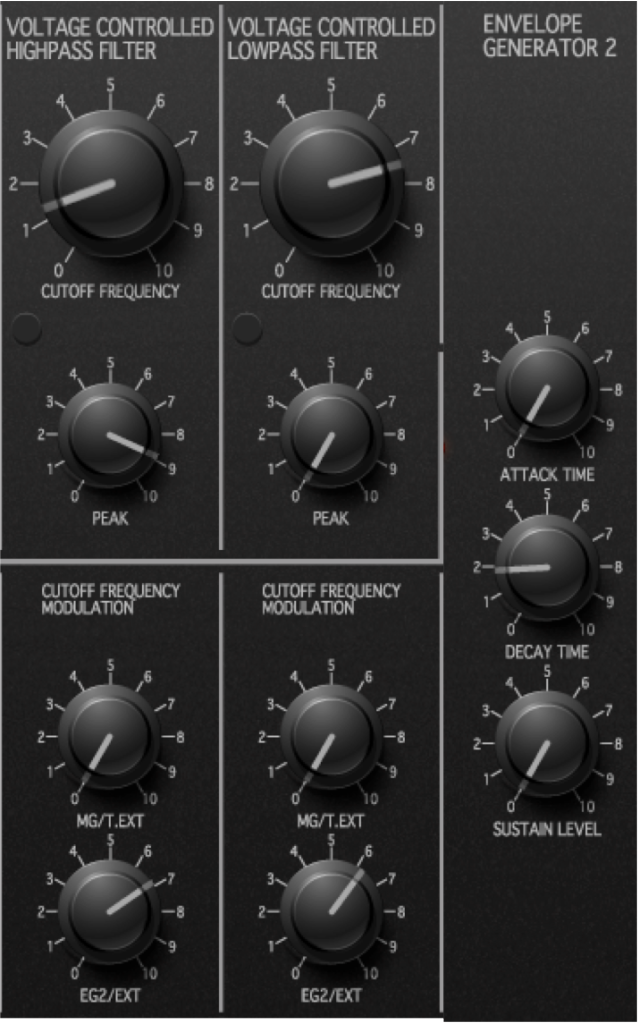 1. The Thud: The main component is a self-oscillating HPF, tuned with the fc control with Q = 9. On its own, it only barely makes a click. But, when you use the EG2 to modulate the cutoff frequency and adjust only the Decay, you get a pitched “deew†sound. Set properly it gives a squeak on the note. The LPF adjusts the brightness. The EG2 mod on the LPF fc has little effect.
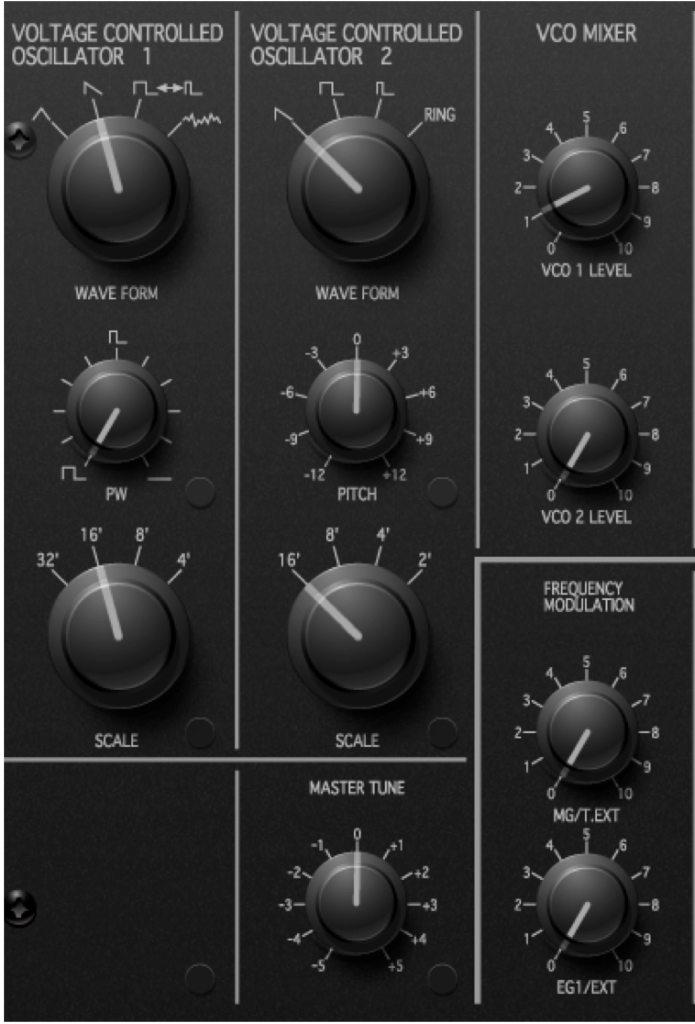 2. The Pitched Attack:Â The Pitched part is VCO1 on Sawtooth; note the VCO1 level is very low. Try turning it up and adjusting the tuning between VCO1 and the self-oscillating HPF. There is no FMod on this VCO. It shares the same Decay through the VCA from EG2 so the two track together.
The Thud and Pitched Attack are the main components and you could stop here and get many different Kicks just from this patch so far.
3. The Pitched Sustain:Â To create the sustain on the Pitch, you have to use a patch trick: route the EG1 OUT to the INITIAL GAIN for the VCA. Why? Because EG2 is being used on the Thud and the Sustain has to be set to 0. EG1 has no settable sustain level: it is always at the MAX value (after the attack period).
EG1 is set for Attack = Release = 0 so it is simply a square pulse, staying HIGH as long as you hold the note down. Make the patch and adjust the VCO1 level to hear it. Adjust the HPF Q to get more or less beating/wobble.
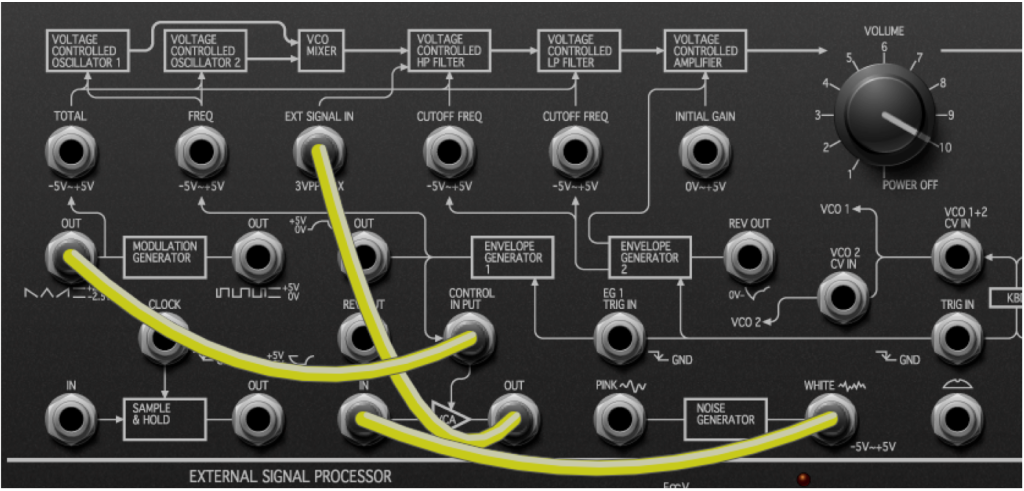 4. The Noise Ramp: The final component in the SYNTH portion is a repeating ramp of noise. This is done using the MG to control the MVCA and patching the white noise into the MVCA input. The MVCA output is routed to the External Input which is then mixed with the other sound components. This figure shows only that routing and removes the EG1 -> INITIAL GAIN patch for clarity.Â
To recap, the SYNTH component has three parts: the Thud, the Pitched Drum, and the Ramped Noise which is mixed via the EXT SIGNAL IN jack.
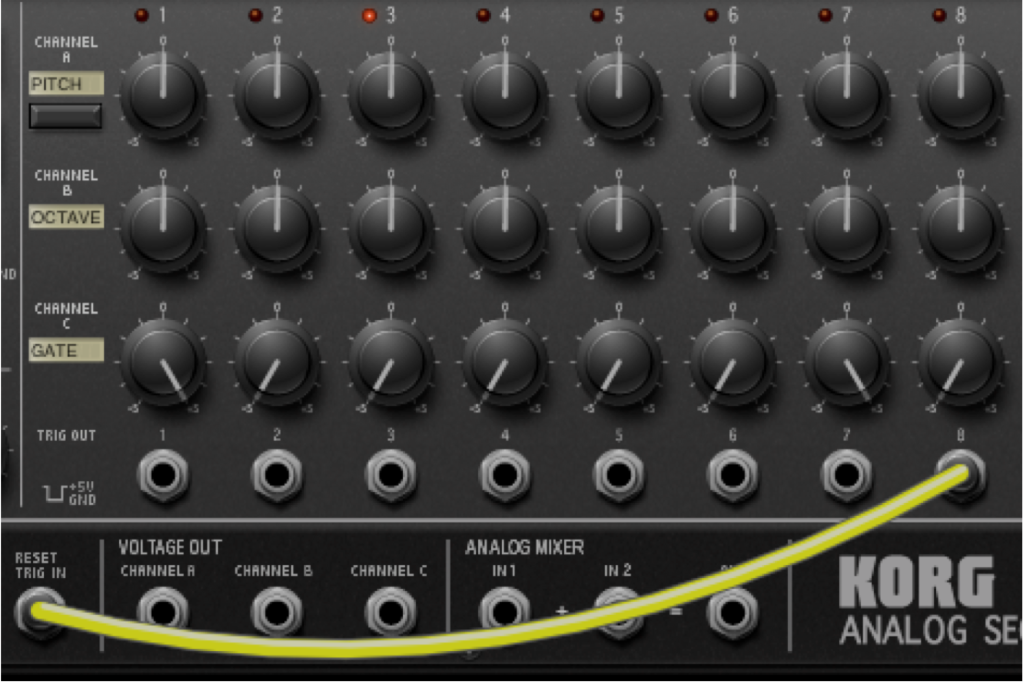
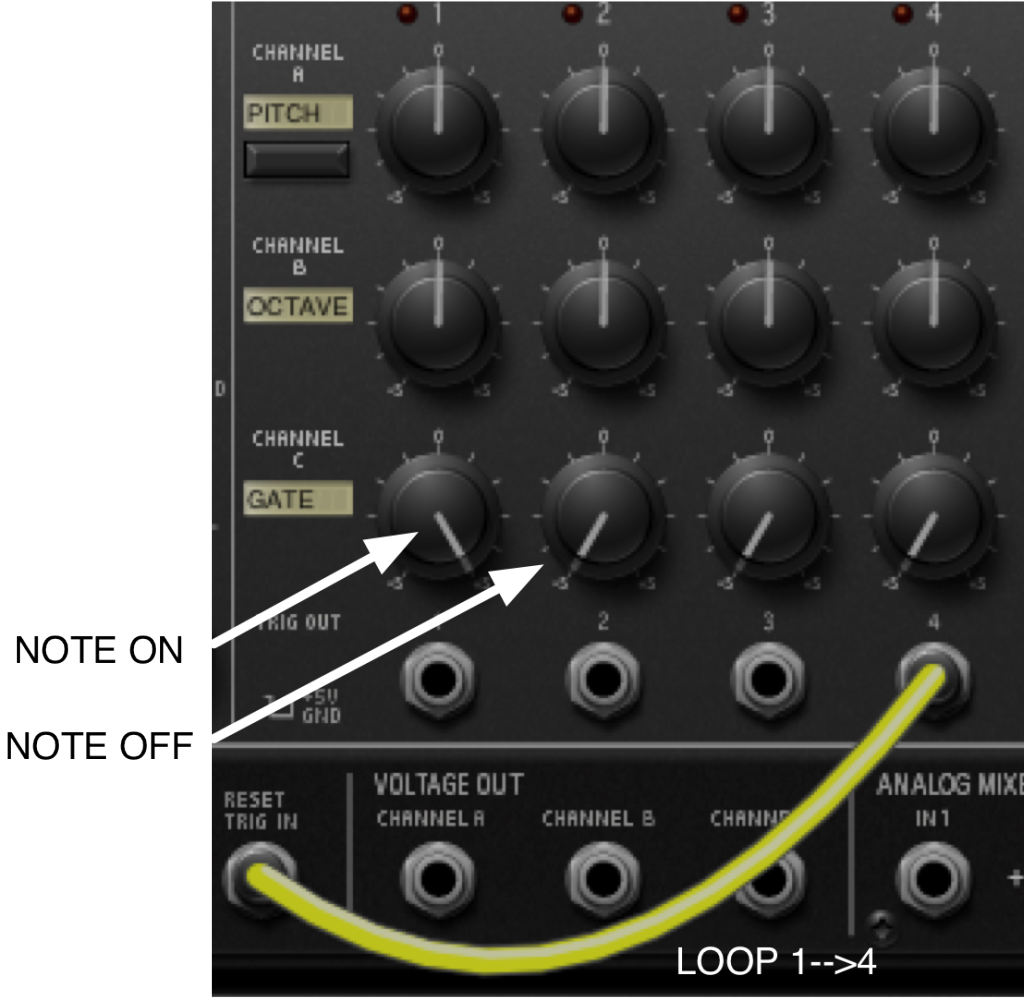 5. Sequencer: The real trick of this patch is in the SEQUENCER. Here, I have copied the Drum patch into a Synth part, so you see the SYNTH sequencer but the same trick applies to the Drum Sequencer. The overall sound consists of the Thud, the Pitch, and just a bit of the Ramped Noise. That bit of ramped noise is accomplished in the Sequencer by setting the first step’s Gate to +5 (max) with the second step’s Gate to -5 (min). The Thud, Pitch and first part of the noise will get triggered in Step 1, while Step 2 will turn off the whole thing. Rather than replicate this 4 times, the RESET TRIG IN is used to just loop over the first 4 Seq Steps. To extend the Noise part of the Kick, set the second Seq Step Gate to +5 and the third Seq Step Gate to -5 — now the noise part lasts longer.
Here is a Rhythmic Variation using the Sequencer and 8 steps.
Step 1: Note On
Step 2,3,4,5,6: Note Off
Step 7: Note On
Step 8: Note Off
5. FX Part:Â The last part is the Effect. Although the KICK sounds good at this point, we can fatten it up and add some fuzzy distortion to it by using the Tube Emulation effect called Valve Force. The only parameter for this effect (Effect Edit 1) controls the tube gain, or distortion level. This really fattens up the sound.
The Complete Kick Drum Patch (click to enlarge)

