Here you will find a collection of Tips and Tricks for using RackAFX(tm), writing code quickly, uncovering hidden features and functions already built into the software plus new C++ functions and code as they become available. Users are encouraged to submit their own Tips and Tricks – use the Contact page to submit anything. If I publish it, I will be sure to include your name/website link (if you wish).
Tips and Tricks List
Backing up a Project or Creating a New-Derivative/Copy Project
Copying the User Interface from another Project
Finding your Project or Plug-Ins Folder
Processing into a Wave File
Using the audio Line-In to Process Audio
Using the Audio Oscillator
Using Status Window
Backing up a Project or Creating a New-Derivative/Copy Project
 Once you have a Project up with lots of slider or button assignments you may want to make a Back Up copy or start a new project where the old one leaves off. Or you might want to create a new Project based on another Project. The way to do this is with the Save Project As.. menu option. Use File->Save Project As.. to create a copy of the current project. The copy will be placed in the same root directory as your project. The copy will have identical C++ file and object names, however the Visual Studio Project will be renamed and, importantly, the Plug-In name string will be altered. You can find this name string in the Constructor of your Plug-In object. By changing the name, you will be able to discern the Plug-Ins as as they populate your User Plug-Ins menu item. NOTE: when you use the Save Project As.. feature it works in Back-Up mode, meaning that after you save the new copy you will still be working on your original. If you want to immediately start working on the new copy, then open it from the File menu or use the Open button.
Copying the User Interface from another Project
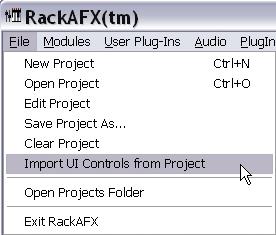 You might want to create a new Project but copy the UI slider and button assignment from another project. You can do this by using the File->Import UI Controls From Project and then browse for the .prj file to copy from. This action will delete your existing UI. When you import another UI, you also import all its variables and enums as well and the controls are already hooked up to these variables. This feature makes it easy to reuse the same GUI for different projects.
Finding your Project or Plug-Ins Folder
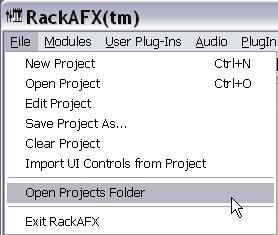 RackAFX conforms to the Windows 7/Vista paradigm of locating your Application Data folder in a roaming file location. This means that each PC user has his/her own Application Data (aka APPDATA) folder. The APPDATA folder has all the RackAFX components and subfolders except the executable and Base Class Files folder, which are located in your Program Files/RackAFX folder. The APPDATA folder has your IR1024, RackAFX Projects and Plug-Ins sub directories inside it. You can find the Project and Plug-Ins folder using two methods: first, the Start Menu’s RackAFX component lets you browse to these locations. You can also find them in the menu items. File->Open Projects Folder takes you to your Projects.
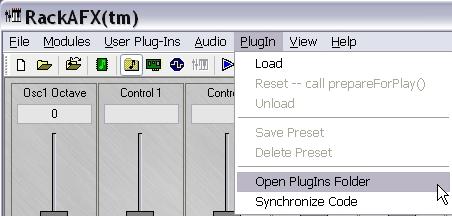 Plug-In->Open Plug-Ins Folder takes you to the Plug-Ins where you can delete offending DLLs or copy DLLs to your VST folders.
Processing into a Wave File
 You might need to process your audio data into a Wave File for exporting into other software or for demo-ing your Plug-In. You can do this offline by using the Audio->Process into WAV File menu item. You will be prompted for a File Name and then the audio is processed offline, meaning you won’t hear it and it will happen as fast as possible, Currently, this WAV file is hardcoded to be a 16-Bit Integer 44.1kHz file. Other options will be available in a later revision.
Using the audio Line-In to Process Audio
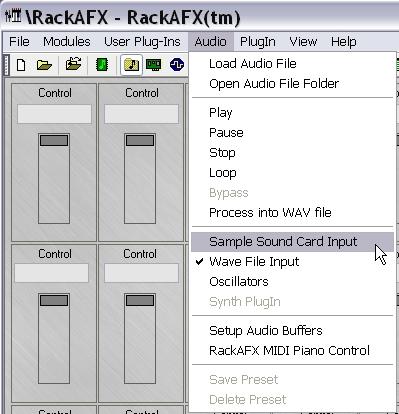 RackAFX was originally designed to be used in blind listening tests to compare its Plug-In algorithms with hardware versions of the same or similar algorithms. You can take advantage of this and process an external audio input, using RackAFX as a stand-alone signal processor. To use this feature, use the Audio->Sample Sound Card Input menu item or  the toolbar button that looks like a sound-card. You will need to adjust your input levels to give proper readings on the RackAFX input LED monitors at the lower right of the UI. Please read the FAQ if you experience problems such as echoes or feedback which are caused by your plug-in crashing while audio is streaming or other plug-in related incidents.
Using the Audio Oscillator
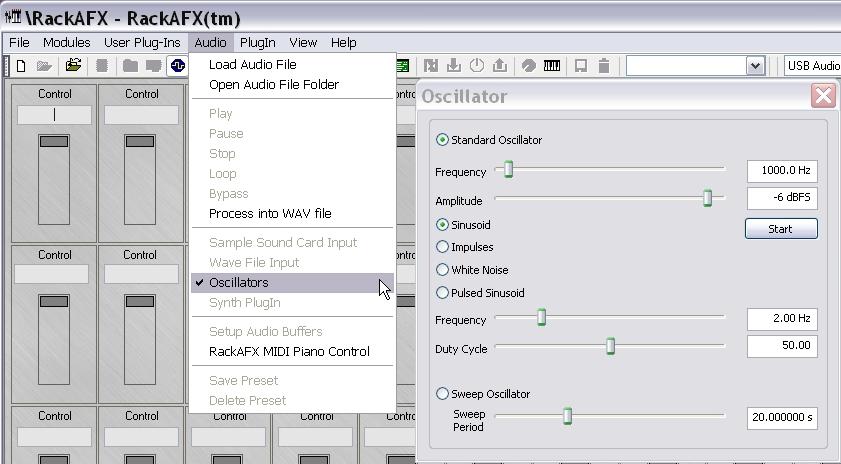 You can use the built-in Oscillator to test your Plug-Ins. When the oscillator is selected, the audio file and sound card inputs are turned off. You can start the Oscillator by using the toolbar button (blue with square wave, next to the sound card button) or the menu item in Audio->Oscillators and when you close the oscillator window, you are automatically switched back into the Audio File Input mode.
Using the Status Window
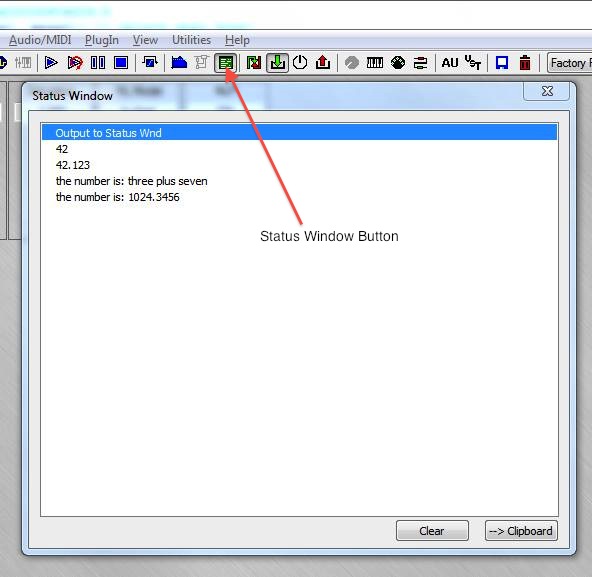
RackAFX has a built-in status window that you can write debug information into. Choose View->Status Window or click on the Status Window Button (see figure below). You can write to the Status Window from any location in your code except the constructor. The reason is that the RackAFX client Window Handle isn’t valid until after construction. If you don’t know what that means, don’t worry. If you need to debug your constructor I suggest you use the technique I show in the video at the bottom of the Video Tutorial page.
You can use helper functions in pluginconstants.h to convert ints and floats to strings as well as concatenate strings. In order to maintain as much compatibility with MacOS as possible (for AU Export) I had to stick to very old fashioned char* strings like you learned in your first C/C++ courses. Here is an example: place this code in your initialize() method. Compile your plug-in, then open the status window. Then click the <Load> button. Here’s the code from my KorgThreeFiveFilter initialize() function that demonstrates several different possibilities; see the image below it for the corresponding output:
bool __stdcall CKorgThreeFiveFilter::initialize()
{
//(1) Â example of sending simple text to the Status Window in RackAFX
// View -> Status Window
sendStatusWndText(“Output to Status Wnd”);
// (2) converting an int to a string and sending that
int n = 42;
// use the helper function in pluginconstants.h
char* intAsString = intToString(n); // delete when done
// send it
sendStatusWndText(intAsString);
// remember to delete!
delete [] intAsString;
// (3) converting float to a string and sending that
float f = 42.12345;
// use the helper function in pluginconstants.h
// second argument is number of significant digits
char* floatAsString = floatToString(f, 3); // delete when done
// send it
sendStatusWndText(floatAsString);
// remember to delete!
delete [] floatAsString;
// (4) concatenating strings (trivial)
char* mess1 = “the number is: “;
char* mess2 = “three plus seven”;
// use the addStrings method in pluginconstants.h
char* finalMessage = addStrings(mess1, mess2); // delete when done!
// send it
sendStatusWndText(finalMessage);
// delete
delete [] finalMessage;
// concatenating converted number with string
float f2 = 1024.3456;
// convert
char* number = floatToString(f2, 4);
// concatenate strings
char* message = addStrings(mess1, number);
// send it
sendStatusWndText(message);
// delete
delete [] message;
return true;
}
This is what the Status Window will look like after the <Load> occurs; you can see the output text. You can use the <Clear> button to clean out the window and ->Clipboard to copy the text to the clipboard to paste into another application.

